◎ 예제 프로젝트 정보
Editor : IntelliJ
Web Framework : SpringBoot - Maven
https://github.com/jooyeokkim/Google-Calendar-with-SpringBoot
GitHub - jooyeokkim/Google-Calendar-with-SpringBoot
Contribute to jooyeokkim/Google-Calendar-with-SpringBoot development by creating an account on GitHub.
github.com
1. Google Identity Platform 접속
Goodle Identity Platform에서는 개발 환경과 개발 언어별로 Google API에 OAuth 2.0을 적용하는 방법을 안내한다.
이번 예제에서는 REST와 JAVA를 사용할 것이다.
https://developers.google.com/identity/protocols/oauth2?hl=en
OAuth 2.0을 사용하여 Google API에 액세스 | Google ID 플랫폼 | Google Developers
참고 : Google의 OAuth 2.0 구현의 사용이 적용됩니다 OAuth는 2.0 정책 . 구글 API는 사용 하여 OAuth 2.0 프로토콜 인증 및 권한 부여를 들어. Google은 웹 서버, 클라이언트 측, 설치 및 제한된 입력 장치 애
developers.google.com

2. Resource Owner의 승인
Client는 Resource Owner가 Resource Server의 서비스를 이용할 수 있게 하기 위한 링크를 제공해 주어야 하고, Resource Owner는 해당 링크를 누름으로써 Resource Server에 접근하겠다는 의사표시를 할 수 있다.
그리고 Google Identity Platform 문서에서는 Resource Owner가 요청해야 하는 URI 양식을 안내해준다.
1) 요청 URI 확인
endpoint(기본 요청 URL)는 아래와 같고, 필수 요청 파라미터는 client_id, redirect_uri, response_type, scope 총 4개이다.

(1) 필수 파라미터
- client_id : API 콘솔 인증 정보 페이지에서 찾을 수 있음
- redirect_uri : API 콘솔 인증 정보 페이지에서 승인된 리디렉션 URI
- response_type : Google OAuth 2.0 endpoint에서 authorization code를 반환할지에 대한 여부. 웹 서버 애플리케이션 환경에서는 code라고 설정하면 됨
- scope : 접근 가능한 리소스 범위, API 문서에서 확인 가능
(2) 권장 파라미터
- access_type : 사용자가 브라우저에 없을 때에도 refresh token을 발급 받을 수 있는지에 대한 여부 (online/offline 택1)
- state : 인증 요청과 인증 서버의 응답간의 상태를 유지하기 위한 string
(3) 선택 파라미터
- include_granted_scope : true로 설정하고 요청이 허가되면, 새 access token은 이전에 허가 받았던 access 범위도 포함함(true/false 택1)
- login_hint : Google 인증 서버에 로그인 힌트를 제공
- prompt : 안내 메세지 관련 파라미터 (none/consent/select_account 택1)
2) 리디렉션 URI 등록
Authorization code를 받을 페이지를 생성하고, 이 페이지의 경로(redirect_uri)를 등록해야 한다.
<receiveAC.mustache>
단순히 authorization code을 확인하기 위한 목적으로 만들었기 때문에 별 내용은 없다.
access token을 요청하기 위한 <form> 태그는 다음 포스팅에서 추가할 것이다.
<html>
<head>
    <meta charset="UTF-8">
    <title>Google Calendar</title>
</head>
<body>
    <p>받는 곳</p>
</body>
</html>

3) 요청 URI 작성 예시
이 요청 URI은 필자의 프로젝트를 기준으로 작성된 것이다.
양식만 참고하고, 여러분은 값만 변경하면 된다.
https://accounts.google.com/o/oauth2/v2/auth
?scope=https%3A%2F%2Fwww.googleapis.com%2Fauth%2Fcalendar%20https%3A%2F%2Fwww.googleapis.com%2Fauth%2Fcalendar.readonly%20
&access_type=offline
&include_granted_scopes=true
&response_type=code
&state=state_parameter_passthrough_value
&redirect_uri=http%3A%2F%2Flocalhost%3A8080%2FreceiveAC
&client_id=499264841555-1kqekv3g1khc8jn5848cn1i8pcp12t29.apps.googleusercontent.com
※ URL Decoder/Encoder
URL/URI의 경우에는 허용되지 않는 문자가 포함되어 있을 수도 있기 때문에, 안전하게 아래 사이트에서 [Encode]를 눌러 변환했다.
https://meyerweb.com/eric/tools/dencoder/
URL Decoder/Encoder
meyerweb.com
<Before>
scope=https://www.googleapis.com/auth/calendar https://www.googleapis.com/auth/calendar.readonly
redirect_uri=http://localhost:8080/receiveAC
<After>
scope=https%3A%2F%2Fwww.googleapis.com%2Fauth%2Fcalendar%20https%3A%2F%2Fwww.googleapis.com%2Fauth%2Fcalendar.readonly%20
redirect_uri=http%3A%2F%2Flocalhost%3A8080%2FreceiveAC
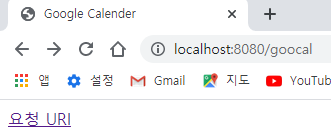
<goocal.mustache>
<html>
    <head>
        <meta charset="UTF-8">
        <title>Google Calendar</title>
    </head>
    <body>
        <a href="https://accounts.google.com/o/oauth2/v2/auth?scope=https%3A%2F%2Fwww.googleapis.com%2Fauth%2Fcalendar%20https%3A%2F%2Fwww.googleapis.com%2Fauth%2Fcalendar.readonly%20&access_type=offline&include_granted_scopes=true&response_type=code&state=state_parameter_passthrough_value&redirect_uri=http%3A%2F%2Flocalhost%3A8080%2FreceiveAC&client_id=499264841555-1kqekv3g1khc8jn5848cn1i8pcp12t29.apps.googleusercontent.com">
            요청 URI
        </a>
    </body>
</html>
3. 요청 URI 전송 (실행 결과)
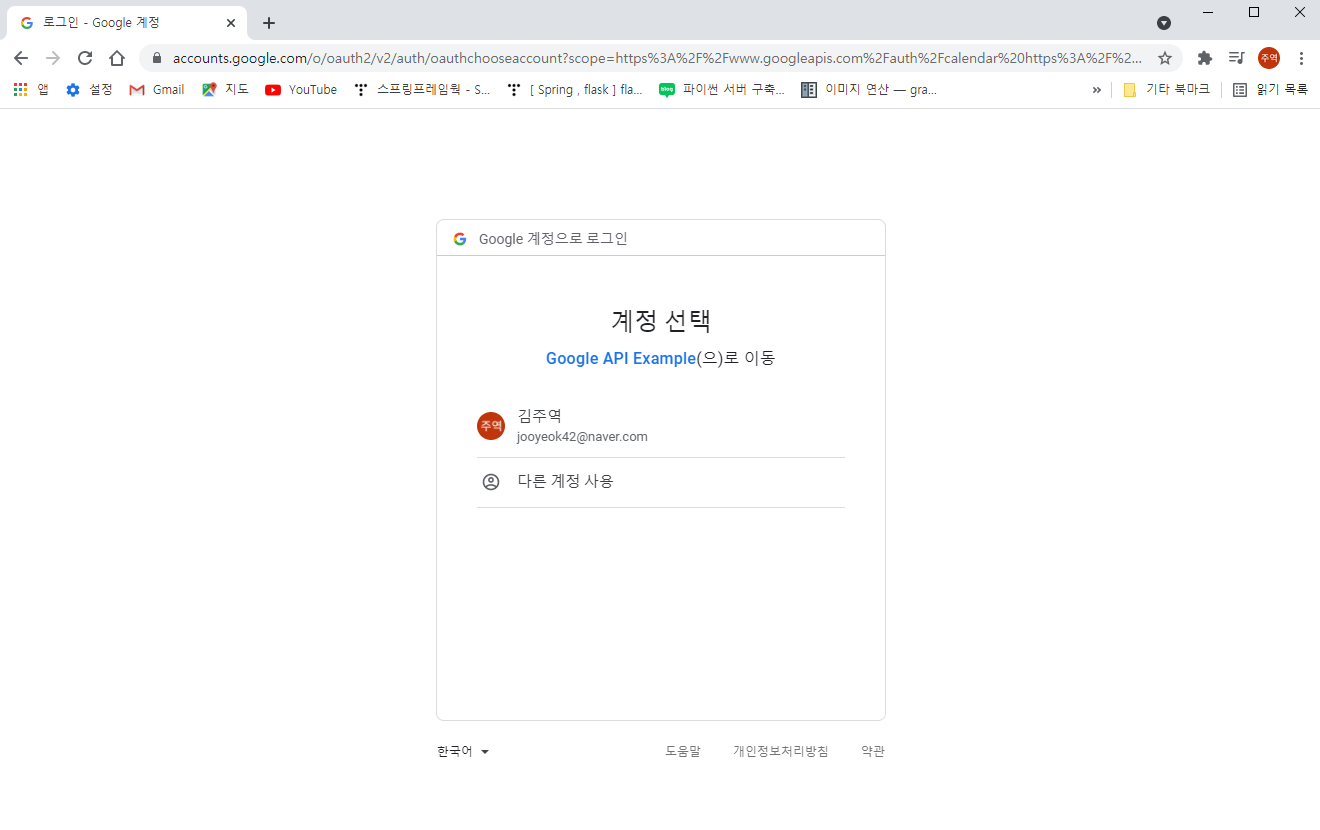
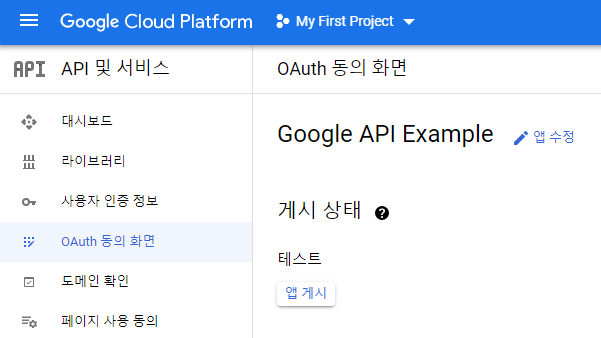
만약 403 access_denied 오류가 나온다면, 게시 상태를 테스트에서 앱 게시로 바꾸면 해결된다.
응답을 성공적으로 받았다

전송 받은 URI을 살펴보면 &code= 부분이 있는데, 이 값이 Authorization code이다.
곧 그토록 기다리던 access token을 구경할 수 있을 것같다.
http://localhost:8080/receiveAC
?state=state_parameter_passthrough_value
&code=4/0AX4XfWh1I7AmT99iyKgVgf8IHRekY...생략
&scope=https://www.googleapis.com/auth/calendar.readonly%20https://www.googleapis.com/auth/calendar'OpenAPI > OAuth' 카테고리의 다른 글
| [OAuth] Kakao Login(1) - 내 애플리케이션 설정 (0) | 2021.08.07 |
|---|---|
| [OAuth] Google Calendar(4) - 내 서비스에 적용하기 (3) | 2021.08.04 |
| [OAuth] Google Calendar(3) - Access Token 받기 (0) | 2021.08.02 |
| [OAuth] Google Calendar(1) - API 문서 읽기 (0) | 2021.08.01 |
| [OAuth] OAuth 2.0 소개 (0) | 2021.07.13 |


댓글