이번 포스팅에서는 Spring Security(3) 에서 소스 코드가 변경된 파일 위주로 설명하고자 한다.
[Spring] Spring Security(3) - DB연동
Spring Security(1), (2)에서는 아이디, 비밀번호, 권한 설정을 security 설정 파일에 직접 작성했다. kimcoder.tistory.com/245 [Spring] Spring Security(2) - 로그인 페이지 구현 Spring Security(1) 포스팅에..
kimcoder.tistory.com
지금까지는 로그인에 실패 했을 때 다음과 같은 에러메세지가 출력되었다.


만약 오류 메세지가 복잡한 경우에는 내용 해석이 어려워질 것이며, 특히 위에 있는 credentials의 뜻을 모르는 사용자는 영단어 검색을 해야하는 수고를 들일 것이다.
로그인에 실패 했을 경우 어떤 것이 잘못되었는지 누구나 이해할 수 있게 직접 오류 메세지를 정하고 싶을 때 이를 커스터마이징을 할 수 있다.
1. 커스터마이징 객체 적용
<security-context.xml>
로그인 실패 로직을 커스터마이징한 객체를 from-login 설정의 authentication-failure-handler-ref속성에 지정하면 된다.
또, 접근 권한이 없을 때는 기본적으로 403 에러 페이지로 넘어가게 되는데, 이런 에러 페이지는 사용자 입장에서 보기 좋지 않을 수 있으므로 이 경우도 커스터마이징했다. 이 커스터마이징한 객체 역시 access-denied-handler 설정의 ref 속성에 지정해주었다.
이번에 적용한 커스터마이징 객체는 이렇게 총 2개이다.
<?xml version="1.0" encoding="UTF-8"?>
<beans:beans xmlns:beans="http://www.springframework.org/schema/beans"
	xmlns:xsi="http://www.w3.org/2001/XMLSchema-instance"
	xmlns:context="http://www.springframework.org/schema/context"
	xmlns:s="http://www.springframework.org/schema/security"
	xsi:schemaLocation="http://www.springframework.org/schema/security http://www.springframework.org/schema/security/spring-security-3.1.xsd
		http://www.springframework.org/schema/beans http://www.springframework.org/schema/beans/spring-beans.xsd
		http://www.springframework.org/schema/context http://www.springframework.org/schema/context/spring-context-3.1.xsd">

	<s:http auto-config="true" use-expressions="true">
		<s:form-login
			username-parameter="user_id"
			password-parameter="user_pw"
			login-processing-url="/login_check"
			login-page="/login.html"
			authentication-failure-handler-ref="loginFailHandler"
		/>
		<s:logout
			logout-url="/security_logout"
			logout-success-url="/"
			invalidate-session="true"
			delete-cookies="true"
		/>
		<s:intercept-url pattern="/login.html*" access="isAnonymous()"/>
		<s:intercept-url pattern="/vip.html*" access="hasRole('ROLE_USER')"/>
		<s:intercept-url pattern="/admin.html*" access="hasRole('ROLE_ADMIN')"/>
		<s:access-denied-handler ref="accessFailHandler"/>
	</s:http>

	<s:authentication-manager>
		<s:authentication-provider user-service-ref="loginService"/>
	</s:authentication-manager>

</beans:beans>
이제 커스터마이징한 loginFailHandler, accessFailHandler 객체를 살펴보자.
2. AuthenticationFailureHandler (loginFailHandler)
<LoginFailHandler.java>
먼저, @Service 어노테이션을 이용하여 "loginFailHandler" bean 객체를 생성해주었다.
그리고 설정 파일에서 from-login 설정의 authentication-failure-handler-ref속성에 지정한 이 객체는 AuthenticationFailureHandler 인터페이스를 상속받아서 onAuthenticationFailure 메소드를 필수적으로 override 해야 한다.
이전 포스팅에서 UserDetails 인터페이스를 상속받은 객체가 override 해야 하는 7개의 메소드를 소개했는데 (사진첨부)

AuthenticationException 객체로 오류 타입 데이터를 확인하여 위 메소드들에 관련된 오류 데이터를 모두 처리할 수 있다. 각 Exception 객체들이 무슨 오류에 해당하는지는 필자가 정한 오류 메세지 내용을 참고하길 바란다.
마지막으로 여러분이 정한 오류 메세지를 LoginFailMessage 속성에 담아 /login.html로 그대로 전송하면 된다.
※ A instanceof B : A가 B의 자손인가의 여부
package com.example.demo;

import java.io.IOException;

import javax.servlet.RequestDispatcher;
import javax.servlet.ServletException;
import javax.servlet.http.HttpServletRequest;
import javax.servlet.http.HttpServletResponse;

import org.springframework.security.authentication.AccountExpiredException;
import org.springframework.security.authentication.AuthenticationServiceException;
import org.springframework.security.authentication.BadCredentialsException;
import org.springframework.security.authentication.CredentialsExpiredException;
import org.springframework.security.authentication.DisabledException;
import org.springframework.security.authentication.LockedException;
import org.springframework.security.core.AuthenticationException;
import org.springframework.security.web.authentication.AuthenticationFailureHandler;
import org.springframework.stereotype.Service;

@Service("loginFailHandler")
public class LoginFailHandler implements AuthenticationFailureHandler{

	@Override
	public void onAuthenticationFailure(HttpServletRequest request, HttpServletResponse response,
			AuthenticationException exception) throws IOException, ServletException {
		// TODO Auto-generated method stub
		if(exception instanceof AuthenticationServiceException) {
			request.setAttribute("LoginFailMessage", "죄송합니다. 시스템에 오류가 발생했습니다.");
		}
		else if(exception instanceof BadCredentialsException) {
			request.setAttribute("LoginFailMessage", "아이디 또는 비밀번호가 일치하지 않습니다.");
		}
		else if(exception instanceof DisabledException) {
			request.setAttribute("LoginFailMessage", "현재 사용할 수 없는 계정입니다.");
		}
		else if(exception instanceof LockedException) {
			request.setAttribute("LoginFailMessage", "현재 잠긴 계정입니다.");
		}
		else if(exception instanceof AccountExpiredException) {
			request.setAttribute("LoginFailMessage", "이미 만료된 계정입니다.");
		}
		else if(exception instanceof CredentialsExpiredException) {
			request.setAttribute("LoginFailMessage", "비밀번호가 만료된 계정입니다.");
		}
		else request.setAttribute("LoginFailMessage", "계정을 찾을 수 없습니다.");
		RequestDispatcher dispatcher = request.getRequestDispatcher("/login.html");
		dispatcher.forward(request, response);
	}
}
3. AccessDeniedHandler (accessFailHandler)
<AccessFailHandler.java>
AccessDeniedHandler 인터페이스를 상속받아 handler 메소드를 필수로 override 하였으며, LoginFailHandler.java와 작동원리는 동일하다.
※ 2021.02.03 comment
이 예제대로 진행한다면 이미 로그인된 상태에서 로그인 페이지를 다시 요청(login.html) 했을 때에도 해당 핸들러가 실행되어 사용자에게 혼란을 줄 수 있다. 이미 인증된 사용자에게는 로그인 버튼이 안보이게 할 수도 있지만 사용자가 주소창에 직접 입력하거나 즐겨찾기로 들어갈 경우까지는 커버할 수 없다.
로그인 페이지로 들어갔는데 이런 화면이 뜨면 이상하지 않는가?
그래서 중복 로그인 요청에 대한 경우는 나누어서 처리할 필요가 있으며, 이러한 문제는 다음 포스팅인 Spring Security(5)에서 해결하기로 한다.
package com.example.demo;

import java.io.IOException;

import javax.servlet.RequestDispatcher;
import javax.servlet.ServletException;
import javax.servlet.http.HttpServletRequest;
import javax.servlet.http.HttpServletResponse;

import org.springframework.security.access.AccessDeniedException;
import org.springframework.security.web.access.AccessDeniedHandler;
import org.springframework.stereotype.Service;

@Service("accessFailHandler")
public class AccessFailHandler implements AccessDeniedHandler{
	@Override
	public void handle(HttpServletRequest request, HttpServletResponse response,
			AccessDeniedException accessDeniedException) throws IOException, ServletException {
		// TODO Auto-generated method stub
		if(accessDeniedException instanceof AccessDeniedException) {
			request.setAttribute("LoginFailMessage", "접근 권한이 없는 계정입니다.");
		}
		RequestDispatcher dispatcher = request.getRequestDispatcher("/login.html");
		dispatcher.forward(request, response);
	}
}
4. 로그인 VIEW
<login.jsp>
LoginFailMessage 속성에 담긴 오류 메세지(속성값)가 있다면 상단에 오류 메세지를 출력한다.
<%@ page language="java" contentType="text/html; charset=UTF-8"
    pageEncoding="UTF-8"%>
<%@ taglib uri="http://java.sun.com/jsp/jstl/core" prefix="c" %>
<link rel="stylesheet" href="/demo/resources/sample.css">
<!DOCTYPE html>
<html>
<head>
<meta charset="UTF-8">
<title>Insert title here</title>
</head>
<body>
	<h1>LOGIN</h1>
	<form action="login_check" method="post">
		<c:if test="${LoginFailMessage!=null}">
			<p> Error : <c:out value="${LoginFailMessage}"/> </p>
		</c:if>
		USER : <input type="text" name="user_id"><br>
		PASSWORD : <input type="password" name="user_pw"><br>
		<input type="submit" value="Login">
	</form>
</body>
</html>
5. 실행
아이디, 비밀번호가 틀렸을 때

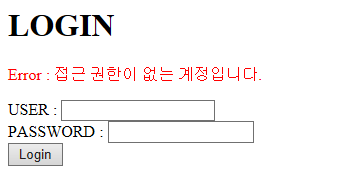
페이지에서 요구하는 접근 권한이 없는 USER이 로그인을 시도했을 때

ENABLED가 FALSE인 계정으로 로그인을 시도했을 때

다음 포스팅에서는 로그인 성공 로직을 커스터마이징하는 방법을 알아볼 것이고,
"3. AccessDeniedHandler (accessFailHandler)" 에서 언급한 2021.02.03 comment문제도 해결할 것이다.
[Spring] Spring Security(5) - 로그인 성공 커스터마이징
이전 포스팅에서는 로그인(인증)에 실패 했을 때의 처리를 돕는 로그인 실패 핸들러를 커스터마이징 했었다. kimcoder.tistory.com/249 [Spring] Spring Security(4) - 로그인 실패 커스터마이징 이번 포스팅에
kimcoder.tistory.com
'Spring Series > Spring Framework' 카테고리의 다른 글
| [Spring] Spring Security(6) - 암호화로 보안 강도 높이기 (2) | 2021.02.08 |
|---|---|
| [Spring] Spring Security(5) - 로그인 성공 커스터마이징 (0) | 2021.02.04 |
| [Spring] Spring Security(3) - DB연동 (0) | 2021.02.01 |
| [Spring] Mybatis (0) | 2021.01.26 |
| [Spring] Spring Security(2) - 로그인 페이지 구현 (0) | 2021.01.20 |


댓글