SpringBoot Document Review 10
https://docs.spring.io/spring-boot/docs/2.1.13.RELEASE/reference/html/
Actuator
Enabling Production-ready Features
https://docs.spring.io/spring-boot/docs/2.1.13.RELEASE/reference/html/production-ready-enabling.html
Endpoints
0. 들어가기 앞서
- Actuator은 애플리케이션을 생산할 때 애플리케이션을 모니터링하고 관리해주는 도구로, HTTP endpoint 또는 JMX를 이용할 수 있다.
- Production-ready는 "제품 단계" 혹은 "생산 가능한" 이라는 의미라고 이해하면 된다.
1. Enabling Production-ready Features
- spring-boot-actuator 모듈은 모든 Spring Boot의 production-ready 기능들을 제공해준다. 단순히 spring-boot-starter-actuator 스타터를 추가해주면 된다.
<dependencies>
	<dependency>
		<groupId>org.springframework.boot</groupId>
		<artifactId>spring-boot-starter-actuator</artifactId>
	</dependency>
</dependencies>
2. Endpoints
1) Endpoint 소개
- Actuator Endpoint는 애플리케이션을 직접 모니터링하거나 애플리케이션과 상호 작용할 수 있게 해준다.
- Spring Boot는 많은 붙박이형 endpoint들을 포함하며, 직접 별도로 추가할 수도 있게 해준다.
- 각 Endpoint별로 enable 또는 disable 여부를 설정할 수도 있다. Endpoint가 enable로 설정되어 있다면, Endpoint가 생성되고 해당 Endpoint Bean이 application context에 존재하게 된다.
- 원격으로 접근하기 위해서는 endpoint는 JMX 또는 HTTP를 경유하여 노출되어야 한다.
- "/actuator"에서 사용 가능한 endpoint들의 목록 및 URL 요청 양식을 조회할 수 있다. 이 페이지를 discovery page라고 한다.
- 대부분의 Application들은 endpoint의 ID가 prefix "/actuator"와 함께 URL로 매핑되는 HTTP 방식을 사용한다. 예를 들어, health 라는 endpoint는 "/actuator/health"로 매핑된다.
- Endpoint의 종류들은 아래에 링크한 문서에서 확인할 수 있다.
2) Enabling Endpoints
- management.endpoint.<id>.enabled 속성을 이용하여 각각의 endpoint에 대해 enable 여부를 설정할 수 있다. 예를 들어, shutdown endpoint는 기본적으로 비활성화되어 있고, 다음과 같은 설정으로 shutdown endpoint를 활성화 시켜줄 수 있다.
management.endpoint.shutdown.enabled=true- management.endpoints.enabled-by-default 속성은 모든 endpoint들에 대한 enable 여부를 설정할 수 있다.
management.endpoints.enabled-by-default=false
management.endpoint.info.enabled=true
- Endpoint를 enable로 설정했더라도, exposure 상태가 아니라면 endpoint에 대한 정보를 확인할 수 없다. exposing 상태를 설정하는 방법은 바로 아래 "3) Exposing Endpoints"에서 설명할 것이다.
3) Exposing Endpoints
- Endpoint는 민감한 정보를 포함할 수도 있기 때문에, 언제 정보를 노출시킬지에 대한 고려가 필요하다.
- JMX에서는 노출을 거의 모두 허용하지만, HTTP에서는 info, health 외에는 노출을 허용하지 않는다.
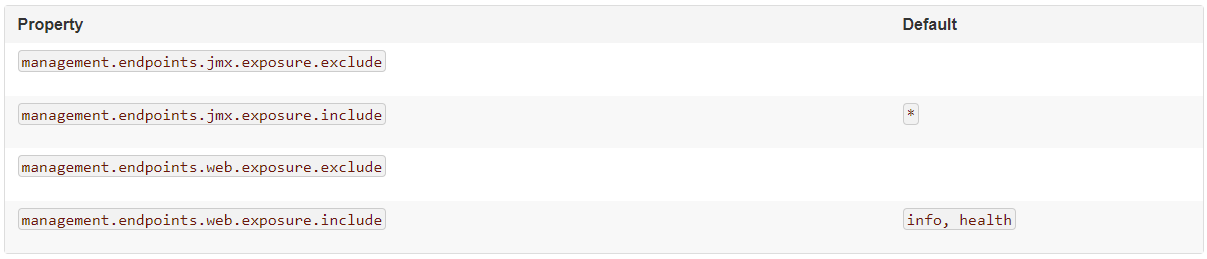
- 다음과 같이 include 또는 exclude 속성을 설정하여 endpoint들의 노출 여부를 설정할 수 있는데, 설정 우선 순위는 exclude가 더 높다.
예시 1) JMX에서 health, info endpoint의 노출만 허용함
management.endpoints.jmx.exposure.include=health,info※ 별도의 exclude 설정은 하지 않은 상태
예시 2) WEB에서 env, beans endpoint를 제외한 모든 노출을 허용함
management.endpoints.web.exposure.include=*
management.endpoints.web.exposure.exclude=env,beans
예시 3) YAML을 이용하여 WEB에서 모든 endpoint들의 노출을 허용하도록 설정함
management:
  endpoints:
    web:
      exposure:
        include: "*"
- 공용 애플리케이션의 경우에는 Spring Security같은 프레임워크를 이용하여 endpoint들을 보호해두는 것이 좋다.
- EndpointFilter Bean을 등록하여 endpoint들의 exposing 설정을 직접 설정할 수도 있다.
4) Securing HTTP Endpoints
- Spring Security를 사용하면 endpoint들은 기본적으로 보호된다. HTTP endpoint들에 대한 별도의 보안 설정을 하고 싶다면 다음과 같이 requestMatcher 객체를 사용하면 된다.
@Configuration
public class ActuatorSecurity extends WebSecurityConfigurerAdapter {

	@Override
	protected void configure(HttpSecurity http) throws Exception {
    		// ENDPOINT_ADMIN 권한을 가진 유저에게 모든 endpoint들로의 접근을 허용
		http.requestMatcher(EndpointRequest.toAnyEndpoint()).authorizeRequests()
				.anyRequest().hasRole("ENDPOINT_ADMIN")
				.and()
			.httpBasic();
	}
}
5) Configuring Endpoints
- Endpoint들은 아무 파라미터도 갖지 않는 함수들을 읽기 위해 응답들을 자동으로 캐싱한다.
- cache.time-to-live 속성을 사용하여 캐시 유지 기간을 설정할 수 있다. 예를 들어, 다음 설정은 beans endpoint의 캐시 유지 기간을 10초로 설정한 것이다.
management.endpoint.beans.cache.time-to-live=10s※ management.endpoint.<Endpoint Name>
- 인증을 필요로 하는 HTTP Request를 만들 때는 Principal 객체가 endpoint의 input으로 간주가 되기 때문에 응답은 캐싱되지 않는다.
6) Discovery Page 기본 경로 설정
- Discovery page의 기본 경로는 "/actuator"인데, management.endpoints.web.base-path 속성을 사용하여 기본 경로를 변경할 수 있다.
management.endpoints.web.base-path=/management※ 기본 경로만 "/"로 지정하면, 다른 매핑들과의 충돌을 방지하기 위해 discovery page가 비활성화 된다.
※ 별도로 management 포트가 설정되지 않았다면 기본 경로는 server.servlet.context-path의 상대 경로가 되고, manage.server.port가 설정되었다면 기본 경로는 management.server.servlet.context-path의 상대 경로가 된다.
7) Endpoint Path 설정
- management.endpoints.web.path-mapping.<name> 속성을 사용하여 Endpoint의 경로를 바꿀 수 있다.
management.endpoints.web.base-path=/
management.endpoints.web.path-mapping.health=healthcheck
8) CORS Support
- CORS는 Cross Origin Resource Sharing의 약자로, 추가 HTTP헤더를 사용하여 한 출처에서 실행 중인 웹 애플리케이션이 다른 출처의 선택한 자원에 접근할 수 있는 권한을 부여하도록 브라우저에 알려주는 체제이다. (보통 Cross Domain 문제에 의해 막혀있다)
- CORS는 기본적으로 비활성화되어 있으며, Actuator상에서는 다음과 같은 설정을 통해 외부로부터의 Endpoint 자원 접근을 허용할 수 있다.
management.endpoints.web.cors.allowed-origins=https://example.com
management.endpoints.web.cors.allowed-methods=GET,POST
9) Cumtom Endpoints 구현하기
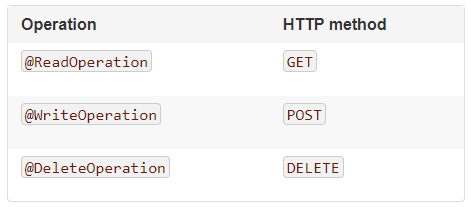
- @Endpoint와 함께 @Bean을 추가하면, @ReadOperation, @WriteOperation 또는 @DeleteOperation 어노테이션이 붙은 모든 메소드들이 JMX를 통하여 자동으로 노출되고, Web Application에서도 Jersey, Spring MVC, 또는 Spring WebFlux을 사용함으로써 HTTP를 통하여 노출시킬 수 있다.
- @Endpoint를 사용하지 않고 @JmxEndpoint 또는 @WebEndpoint을 사용함으로써, 기술별 endpoint들을 작성할 수 있다. 예를 들어, @WebEndpoint는 HTTP을 통해서만 노출되고 JMX를 통해 노출되지는 않는다.
- @EndpointWebExtension과 @EndpointJmxExtension을 사용함으로써, 기존 endpoint들을 확장할 수 있도록 기술별 함수들을 제공할 수 있다.
- 웹 프레임워크 특화 기능들에 접근하기 위해 Servlet이나 Spring @Controller, @RestController endpoint들을 구현할 수 있다.
(1) Input 받기
- endpoint에 있는 함수들은 그들의 파라미터를 통하여 input을 받게 된다. Web을 통하여 노출된다면, 그 파라미터값들은 URL의 quesy 파라미터와 JSON request body로부터 가져온다. 그리고 JMX를 통하여 노출된다면, 그 파라미터값들은 MBean의 함수의 파라미터로 매핑된다.
{
	"name": "test",
	"counter": 42
}
※ JSON의 각 루트 속성이 endpoint의 파라미터와 매핑된다. 이 예제에서는 String name, int counter로 매핑된다.
- 파라미터는 기본적으로 필수 사항이며, @org.springframework.lang.Nullable 어노테이션을 붙이면 선택 사항으로 변경할 수 있다.
- 참고로, input이 연산 메소드의 파라미터와 매핑되려면 endpoint를 구현한 코드가 -parameters 속성과 함께 컴파일 되어야 하는데, 만약 Spring Boot의 Gradle 플러그인을 사용하고 있거나 Maven의 spring-boot-starter-parent를 이용하고 있다면 자동으로 컴파일된다.
- Input 타입은 자동으로 요구되는 타입으로 변환된다. 연산 메소드를 호출하기 전에, JMX 또는 HTTP 요청을 통해 전달 받는 Input은 ApplicationConversionService 인스턴스에 의해 요구되는 타입으로 변환되는 것이다.
(2) Custom Web Endpoints
- @Endpoint, @WebEndpoint, 또는 @WebEndpointExtension의 연산들은 자동으로 Jersey, Spring MVC 또는 Spring WebFlux에서 HTTP를 통하여 노출된다.
<1> Web Endpoint Request Predicates
- Web으로 노출되는 endpoint의 각 연산을 위한 request predicate가 자동으로 생성된다.
※ predicate : bool 형식을 반환하는 함수류 또는 판단
<2> Path
- predicate의 경로는 endpoint의 ID와 web에 노출되는 endpoint들의 기본 경로에 의해 결정된다. 기본 경로의 기본값은 /actuator이다.
- 경로의 커스터마이징은 연산 메소드의 하나 이상의 파라미터에 @Selector 어노테이션을 붙임으로써 가능하다. 이러한 파라미터는 path predicate에 path 변수로 추가되며, 변수값은 endpoint 연산이 호출되면 연산 메소드에 전달된다.
<3> Consumes 항목
- request body를 사용하는 @WriteOperation에서, predicate의 consumes 항목은 application/vnd.spring-boot.actuator.v2+json, application/json이다. 다른 연산들의 consumes 항목은 빈 값이다.
<4> Produces 항목
- prediate의 produces 항목은 @DeleteOperation, @ReadOperation, 그리고 @WriteOperation의 produces 속성에 의해 결정된다. produces 속성은 선택 사항이며, 생략한다면 자동으로 결정된다. 연산 메소드가 void를 반환한다면 produces 항목은 빈 값이다.
※ 만약 연산 메소드가 org.springframework.core.io.Resource 객체를 리턴한다면 produces 항목은 application/octet-stream이며, 나머지 연산들에 대한 produces 항목은 application/vnd.spring-boot.actuator.v2+json, application/json이다.
※ @RequestMapping의 produces 속성을 이용하여 Response의 Content-Type을 제어할 수 있다.
<5> Web Endpoint의 응답 상태
- Endpoint 연산의 기본적인 응답 형태는 연산의 종류(read, write, delete)와 반환 내용에 의해 결정된다.
- @ReadOperation의 응답 상태는 값을 리턴하는 경우에는 200(OK)이고, 값을 리턴하지 않는 경우에는 404(Not Found)이다.
- @WriteOperation 또는 @DeleteOperation의 응답 상태는 값을 리턴하는 경우에는 200(OK)이고, 값을 리턴하지 않는 경우에는 204(No Content)이다.
- 필수 파라미터에 오류(미포함, 타입 변환 불가)가 있다면, 연산 메소드는 호출되지 않고 응답 상태는 400(Bad Request)가 된다.
<6> Web Endpoint의 부분 요청
- HTTP 자원의 부분을 요청하기 위해 HTTP range request를 사용할 수 있다. 만약 Spring MVC 또는 Spring WebFlux를 사용한다면, org.springframework.core.io.Resource 객체를 반환하는 연산들은 자동으로 range requests를 지원한다.
※ Jersey는 range requests를 지원하지 않는다.
<7> Web Endpoint Security
- Web endpoint 또는 web 특화 endpoint extension의 연산은 현재 java.security.Principal 또는 org.springframework.boot.actuate.endpoint.SecurityContext를 메소드 파라미터로 받는다.
- Principal은 일반적으로 사용자의 권한 보유 여부에 따라 다른 동작을 하기 위해 @Nullable와 함께 사용된다.
- SecurityContext는 일반적으로 isUserInRole(String) 메소드를 사용하여 권한을 체크할 때 사용된다.
(3) Servlet endpoints
- Servlet은 Supplier<EndpointServlet> 인터페이스를 상속받은 @ServletEndpoint 클래스를 구현함으로써 endpoint로써 노출될 수 있다.
- Servlet endpoint는 Servlet container과의 깊은 통합을 제공하지만 이식에 대한 어려움이 있다.
- Servlet endpoint는 기존의 Servlet을 endpoint로써 노출되도록 한다. 새 endpoint에 대해서는 가능한 @Endpoint와 @WebEndpoint 어노테이션을 사용하는 것이 좋다.
(4) Controller endpoints
- @ControllerEndpoint와 @RestControllerEndpoint는 오직 Spring MVC 또는 Spring WebFlux에 의해 노출되는 endpoint를 구현하기 위해 사용된다.
- @RequestMapping과 @GetMapping과 같은 표준 어노테이션들이 메소드들의 매핑에 이용되며, Endpoint의 ID는 경로의 prefix가 된다.
- Controller endpoint는 Spring Web Framework와의 깊은 통합을 제공하지만 이식에 대한 어려움이 있다.
- 가능한 @Endpoint와 @WebEndPoint 어노테이션을 사용하는 것이 좋다.
10) Health Information
(1) Health Information 소개
- Health endpoint는 실행중인 애플리케이션의 상태를 체크하기 위해 사용될 수 있다.
- 소프트웨어를 감시하여 production 시스템이 다운됐을 때 누군가에게 통지할 수 있다.
- Health endpoint에 의해 노출되는 정보는 management.endpoint.health.show-details 속성에 의해 결정되며, 기본값은 never이다.

※ 하나 이상의 endpoint role에 속하는 사용자는 권한이 있는 것으로 고려된다. 만약 endpoint의 role이 아무것도 설정되어 있지 않다면(기본 상태), 모든 인증된 사용자가 권한이 있는 것으로 고려된다. role은 management.endpoint.health.role 속성으로 설정할 수 있다.
※ 애플리케이션에 보안을 적용한 상태에서 always 옵션을 사용하고 싶다면, 애플리케이션의 보안 설정은 인증된 사용자와 인증되지 않은 사용자 모두에게 health endpoint로의 접근을 허가하도록 적용되어 있어야 한다.
- Health 데이터는 HealthIndicatorRegistry의 내용으로부터 모이게 된다.
- 기본적으로 최종 시스템 상태는 HealthAggregator로부터 유도된다. HealthAggregator은 상태들의 순차 리스트를 기반으로 각 HealthIndicator의 상태들을 정렬하는 역할을 하며, 정렬된 리스트의 첫 번째 상태가 health status로 사용된다. 만약 HealthIndicator가 HealthAggregator가 알 수 있는 어떠한 상태도 반환하지 않는다면 UNKNOWN 상태가 사용된다.
- HealthIndicatorRegistry를 이용하여 런타임에서 health indicator들을 등록하거나 제외할 수 있다.
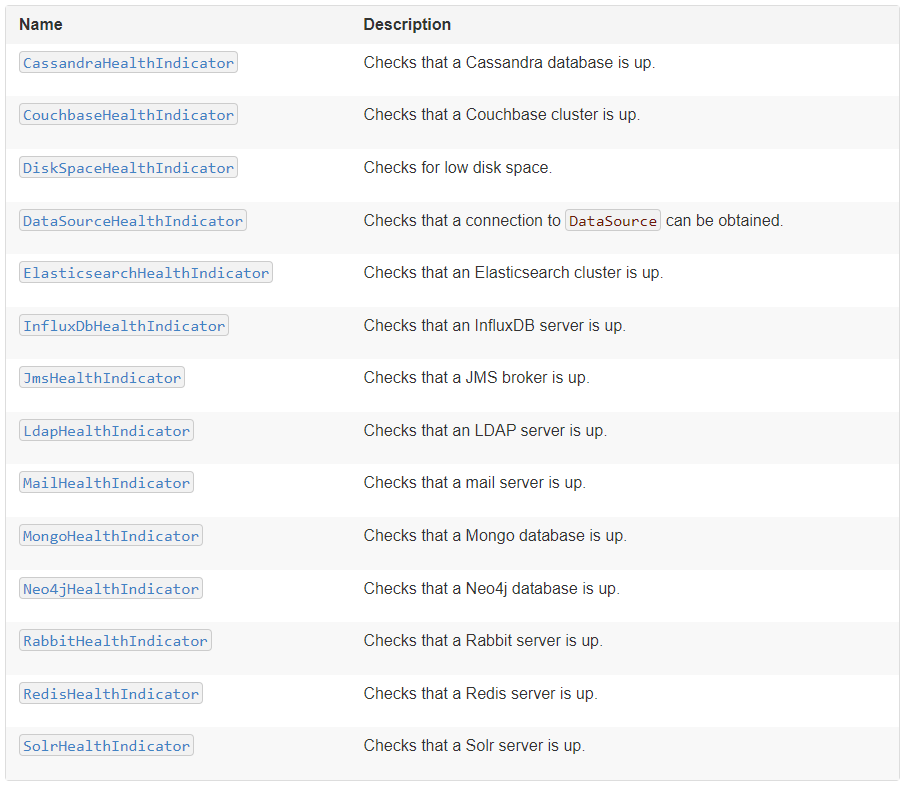
(2) 자동 설정된 HealthIndicator들
- 기본적으로, 모든 HealthIndicator 인스턴스들은 ApplicationContext에 정의되어 있다.
- management.health.defaults.enabled 속성을 설정하여 이들을 비활성화할 수도 있다.
(3) Custom HealthIndicator 작성하기
- Custom health 정보를 제공하기 위해, HealthIndicator 인터페이스를 구현한 Bean을 등록할 수 있다. HealthIndicator 인터페이스를 구현하기 위해서는 health() 메소드를 오버라이딩해서 Health 객체를 리턴하도록 해야 한다. Health 응답은 상태를 반드시 포함해야 하며, 선택사항으로 추가적인 정보를 제공할 수도 있다.
import org.springframework.boot.actuate.health.Health;
import org.springframework.boot.actuate.health.HealthIndicator;
import org.springframework.stereotype.Component;

@Component
public class MyHealthIndicator implements HealthIndicator {

	@Override
	public Health health() {
		int errorCode = check(); // perform some specific health check
		if (errorCode != 0) {
			return Health.down().withDetail("Error Code", errorCode).build();
		}
		return Health.up().build();
	}
}
※ 만약 클래스 이름에 HealthIndicator suffix가 존재한다면, HealthIndicator의 식별자는 "HealthIndicator"를 제외한 bean의 이름이 된다. 위의 예제에서, health 정보는 "my"라는 엔트리 이름을 가진다.
- Health는 미리 정의된 Status 타입 외에도, 새 시스템 상태를 표현하는 사용자 정의 Status를 반환하도록 할 수 있다. 이와 같은 경우에는, HealthAggregator 인터페이스를 구현한 custom 구현체를 사용하거나, management.health.status.order 속성을 사용하여 기본 구현체가 설정되어 있어야 한다. 예를 들어, FATAL 코드를 가진 새 Status가 HealthIndicator 구현체들중 하나로 사용되고 있었다고 하면, 심각한 상태 순서대로 정렬하고 싶다면 다음과 같이 설정하면 된다.
management.health.status.order=FATAL, DOWN, OUT_OF_SERVICE, UNKNOWN, UP
- 만약, status 매핑을 직접 등록하고 싶다면 다음 예시와 같이 management.health.status.http-mapping.<code> 속성을 사용하면 된다. 아래 예시의 경우에는 FATAL이 503(service unavailable)로 매핑된다.
management.health.status.http-mapping.FATAL=503※ 추가적인 제어가 필요하다면, 별도의 HealthStatusHttpMapper Bean을 정의할 수도 있다.
(4) Reactive Health Indicators
- Spring WebFlux와 같은 Reactive Application용으로, ReactiveHealthIndicator은 health를 얻기 위한 비동기적인 방식을 제공한다.
- HealthIndicator과 유사하게 health 데이터는 ReactiveHealthIndicatorRegistry의 내용으로부터 모이게 되며, 기본적으로 모든 HealthIndicator과 ReactiveHealthIndicator 인스턴스들은 ApplicationContext에 정의되어 있다.
- Reactive API를 사용하지 않는 일반적인 HealthIndicator는 elastic scheduler에서 실행된다.
- ReactiveHealthIndicatorRegistry는 Reactive Application의 런타임에서 health indicator들을 등록 및 제외하도록 사용되어야 한다. 만약, 일반적인 HealthIndicator를 등록해야 한다면, HealthIndicatorReactiveAdapter으로 이를 감싸야 한다.
- Reactive API로부터 사용자 정의 health 정보를 제공하려면, ReactiveHealthIndicator 인터페이스를 구현한 Bean을 등록할 수 있다.
@Component
public class MyReactiveHealthIndicator implements ReactiveHealthIndicator {

	@Override
	public Mono<Health> health() {
		return doHealthCheck() // Mono<Health>를 반환하는 특정 health check을 수행함
			.onErrorResume(ex -> Mono.just(new Health.Builder().down(ex).build()));
	}
}
※ 자동으로 에러를 처리하기 위해, AbstractReactiveHealthIndicator 클래스를 상속 받을 수도 있다.
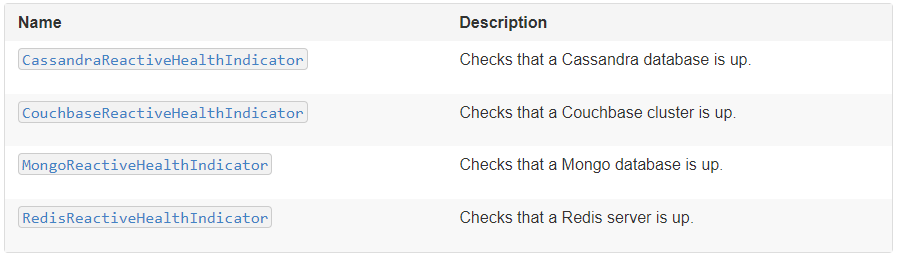
(5) 자동 설정된 ReactiveHealthIndicator들
- 필요에 따라, Reactive indicator들은 일반 indicator를 대신한다. 그리고, 명시적으로 처리되지 않은 모든 HealthIndicator들은 자동으로 wrapping된다.
11) Application Information
(1) Application Information 소개
- Application Information은 ApplicationContext에 정의되어 있는 모든 InfoContributor bean들로부터 모인 다양한 정보들을 노출한다.
- Spring Boot는 자동 설정된 많은 InfoContributor bean들을 포함하며, 이들을 직접 작성할 수도 있다.
(2) 자동 설정된 InfoContributor들
- 아래의 InfoContributor들은 적절한 때에 Spring Boot에 의해 자동으로 설정된다.
- management.info.defaults.enabled 속성을 설정하여 이들을 비활성화할 수도 있다.

(3) Custom Application Information
- info.* 속성을 사용하면 info endpoint에 의해 노출되는 데이터를 커스터마이징할 수 있으며, info key 아래에 있는 모든 Environment 속성들이 자동으로 노출된다.
info.app.encoding=UTF-8
info.app.java.source=1.8
info.app.java.target=1.8
- 속성값들을 하드코딩하지 않고, 빌드 시점에 확장하려면 다음과 같이 설정한다.
info.app.encoding=@project.build.sourceEncoding@
info.app.java.source=@java.version@
info.app.java.target=@java.version@
(4) Git Commit Information
- info endpoint의 또 다른 유용한 기능은 프로젝트가 빌드되었을 때 git 소스 코드 저장소의 상태에 관한 정보를 표시할 수 있다는 것이다.
- GitProperties bean이 활성화되어 있다면, git.branch, git.commit.id, git.commit.time 속성이 노출된다. 만약 root classpath에 git.properties 파일이 있다면 GitProperties bean이 자동 설정된다.
- Maven 유저의 경우에 spring-boot-starter-parent POM을 사용하고 있다면, git.properties 파일을 생성하기 위해 POM에 다음 플러그인을 추가할 수 있다.
<build>
	<plugins>
		<plugin>
			<groupId>pl.project13.maven</groupId>
			<artifactId>git-commit-id-plugin</artifactId>
		</plugin>
	</plugins>
</build>
※ Gradle 유저의 경우에는 gradle-git-properties 플러그인을 추가한다.
- 모든 git information(git.properties의 모든 내용)을 표시하고 싶다면, 다음과 같이 설정하면 된다.
management.info.git.mode=full
(5) Build Information
- classpath에 META-INF/build-info.properties 파일이 있고, BuildProperties bean이 활성화되어 있다면, info endpoint는 build에 관한 정보를 표시할 수 있다.
- Spring Boot가 BuildProperties Bean을 자동 설정하도록 하려면, Maven 유저의 경우에는 spring-boot-maven-plugin에 다음과 같이 build-info goal을 포함한 execution을 추가한다.
<build>
	<plugins>
		<plugin>
			<groupId>org.springframework.boot</groupId>
			<artifactId>spring-boot-maven-plugin</artifactId>
			<version>2.1.13.RELEASE</version>
			<executions>
				<execution>
					<goals>
						<goal>build-info</goal>
					</goals>
				</execution>
			</executions>
		</plugin>
	</plugins>
</build>
※ Gradle 유저의 경우에는 build.gradle 파일에 다음과 같이 추가한다.
springBoot {
	buildInfo()
}
(6) Custom InfoContributor 작성하기
- Custom application 정보를 제공하기 위해, 다음 예제와 같이 InfoContributor 인터페이스를 구현한 bean을 등록할 수 있다.
import java.util.Collections;

import org.springframework.boot.actuate.info.Info;
import org.springframework.boot.actuate.info.InfoContributor;
import org.springframework.stereotype.Component;

@Component
public class ExampleInfoContributor implements InfoContributor {

	@Override
	public void contribute(Info.Builder builder) {
		builder.withDetail("example",
				Collections.singletonMap("key", "value"));
	}
}
표시 결과
{
	"example": {
		"key" : "value"
	}
}
'Spring Series > Document' 카테고리의 다른 글
| [SpringBoot] 공식 문서 요약(11) - Actuator 관리 (0) | 2022.01.16 |
|---|---|
| [SpringBoot] 공식 문서 요약(9) - RestTemplate, WebClient (0) | 2022.01.08 |
| [SpringBoot] 공식 문서 요약(8) - NoSQL 기술 (0) | 2021.12.30 |
| [SpringBoot] 공식 문서 요약(7) - SQL 데이터베이스 (0) | 2021.12.19 |
| [SpringBoot] 공식 문서 요약(6) - Security, OAuth2 (0) | 2021.11.27 |


댓글