만약 관리자 페이지처럼 특정 계정으로만 접근 해야하는 페이지를 만들어야 한다면 어떻게 할까?
이번 포스팅에서 다룰 Spring Security를 사용한다면 이 궁금증을 해결할 수 있다. 이제 사용법을 알아보자.
1. Dependency 추가
Spring Security를 사용하기 위해 pom.xml에 dependency 4개를 다음과 같이 추가해준다.
버전은 가급적 Spring 버전과 동일하게 하는게 좋다. 본인은 여기서 버전 문제로 상당한 시간을 날렸다.
<dependencies>

  ...

  <dependency>
    <groupId>org.springframework.security</groupId>
    <artifactId>spring-security-config</artifactId>
    <version>3.1.1.RELEASE</version>
  </dependency>

  <dependency>
    <groupId>org.springframework.security</groupId>
    <artifactId>spring-security-core</artifactId>
    <version>3.1.1.RELEASE</version>
  </dependency>

  <dependency>
    <groupId>org.springframework.security</groupId>
    <artifactId>spring-security-web</artifactId>
    <version>3.1.1.RELEASE</version>
  </dependency>

  <dependency>
    <groupId>org.springframework.security</groupId>
    <artifactId>spring-security-taglibs</artifactId>
    <version>3.1.1.RELEASE</version>
  </dependency>
</dependencies>
2. Security 설정 파일 작성
appServlet 폴더 우클릭 -> New -> Other... 에서 Spring Bean Configuration File을 선택한다.

설정 파일 이름은 security-context.xml로 정했다.

beans, context, security를 선택하여 스키마를 자동으로 추가시킨다.

<security-context.xml>
<?xml version="1.0" encoding="UTF-8"?>
<beans xmlns="http://www.springframework.org/schema/beans"
	xmlns:xsi="http://www.w3.org/2001/XMLSchema-instance"
	xmlns:context="http://www.springframework.org/schema/context"
	xmlns:s="http://www.springframework.org/schema/security"
	xsi:schemaLocation="http://www.springframework.org/schema/security http://www.springframework.org/schema/security/spring-security-3.1.xsd
		http://www.springframework.org/schema/beans http://www.springframework.org/schema/beans/spring-beans.xsd
		http://www.springframework.org/schema/context http://www.springframework.org/schema/context/spring-context-3.1.xsd">

	<s:http auto-config="true" use-expressions="true">
		<s:intercept-url pattern="/login.html*" access="isAnonymous()"/>
		<s:intercept-url pattern="/vip.html*" access="hasRole('ROLE_USER')"/>
		<s:intercept-url pattern="/admin.html*" access="hasRole('ROLE_ADMIN')"/>
		<s:access-denied-handler error-page="/"/>
	</s:http>

	<s:authentication-manager>
		<s:authentication-provider>
			<s:user-service>
				<s:user name="codelove" password="1365" authorities="ROLE_USER"/>
				<s:user name="kimcoder" password="1366" authorities="ROLE_USER, ROLE_ADMIN"/>
			</s:user-service>
		</s:authentication-provider>
	</s:authentication-manager>

</beans>
사용자가 특정 url 패턴으로 요청을 하면, 여기서 먼저 인증 절차를 거친다.
먼저, security 스키마를 네임스페이스 s로 쓸 수 있게 xmins:s 로 스키마를 추가했다.
s:intercept-url의 pattern이 방금 언급한 특정 url 패턴이고, access에서는 권한을 체크한다.
권한이름(authorities)은 s:user에서 name, password와 같이 생성할 수 있으며, spring security에서 제공하는 로그인 페이지에서 name, password를 맞게 입력했을 경우 해당 권한을 획득할 수 있게 된다. 그리고 권한은 한 번에 2개 이상 가질 수도 있다.
권한을 가진 사용자는 해당 pattern에 맞는 url에 접근할 수 있게 되는 것이다.
마지막으로, s:access-denied-handler는 접근 오류(403) 페이지를 대체할 페이지를 설정할 수 있다. error-page를 "/"로 설정하여 403 page를 home page로 redirect시킨다.
※ access 설명
s:http의 use-expressions를 true로 설정해야 다음과 같이 메소드 형태로 권한을 체크할 수 있다.
- isAnonymous() : 익명일 때만 접근 허용(로그인 상태에서는 접근을 허용하지 않음)
- hasRole('role') : 해당 권한이 있다면 접근 허용
- hasAnyRole('role1', 'role2') : 하나의 권한이라도 가진다면 접근 허용
- isAuthenticated() : 이미 로그인 인증을 받은 User일 경우 접근 허용, 익명 사용자는 로그인 페이지로 이동
- isRememberMe() : 자동 로그인 대상 User일 경우 접근 허용
- isFullyAuthenticated() : 자동 로그인 없이 로그인 인증을 받은 User일 경우 접근 허용
- permitAll : 모두 접근 허용
- denyAll : 모두 접근 미허용
<servlet-context.xml>
특별히 추가된 코드는 없다.
<?xml version="1.0" encoding="UTF-8"?>
<beans:beans xmlns="http://www.springframework.org/schema/mvc"
	xmlns:xsi="http://www.w3.org/2001/XMLSchema-instance"
	xmlns:beans="http://www.springframework.org/schema/beans"
	xmlns:context="http://www.springframework.org/schema/context"
	xsi:schemaLocation="http://www.springframework.org/schema/mvc http://www.springframework.org/schema/mvc/spring-mvc-3.1.xsd
		http://www.springframework.org/schema/beans http://www.springframework.org/schema/beans/spring-beans-3.1.xsd
		http://www.springframework.org/schema/context http://www.springframework.org/schema/context/spring-context-3.1.xsd">

	<!-- DispatcherServlet Context: defines this servlet's request-processing infrastructure -->

	<!-- Enables the Spring MVC @Controller programming model -->
	<annotation-driven />

	<!-- Handles HTTP GET requests for /resources/** by efficiently serving up static resources in the ${webappRoot}/resources directory -->
	<resources mapping="/resources/**" location="/resources/" />

	<!-- Resolves views selected for rendering by @Controllers to .jsp resources in the /WEB-INF/views directory -->
	<beans:bean class="org.springframework.web.servlet.view.InternalResourceViewResolver">
		<beans:property name="prefix" value="/WEB-INF/views/" />
		<beans:property name="suffix" value=".jsp" />
	</beans:bean>

	<context:component-scan base-package="com.example.demo" />
</beans:beans>
3. web.xml에 Security 설정 파일 적용
<web.xml>
context-param의 param-value에 아까 작성한 security 설정 파일 경로를 추가했다.
그리고 security를 적용할 수 있게 모든 요청에 <filter>를 적용했다.
그리고 모든 요청은 .html로 받도록 servlet-mapping도 수정해주었다.
이 외에 특별히 추가된 부분은 없다.
<?xml version="1.0" encoding="UTF-8"?>
<web-app version="2.5" xmlns="http://java.sun.com/xml/ns/javaee"
	xmlns:xsi="http://www.w3.org/2001/XMLSchema-instance"
	xsi:schemaLocation="http://java.sun.com/xml/ns/javaee https://java.sun.com/xml/ns/javaee/web-app_2_5.xsd">

	<!-- The definition of the Root Spring Container shared by all Servlets and Filters -->
	<context-param>
		<param-name>contextConfigLocation</param-name>
		<param-value>
			/WEB-INF/spring/root-context.xml
			/WEB-INF/spring/appServlet/security-context.xml
		</param-value>
	</context-param>

    <filter>
        <filter-name>springSecurityFilterChain</filter-name>
        <filter-class>org.springframework.web.filter.DelegatingFilterProxy</filter-class>
    </filter>
    <filter-mapping>
        <filter-name>springSecurityFilterChain</filter-name>
        <url-pattern>/*</url-pattern>
    </filter-mapping>

	<!-- Creates the Spring Container shared by all Servlets and Filters -->
	<listener>
		<listener-class>org.springframework.web.context.ContextLoaderListener</listener-class>
	</listener>

	<!-- Processes application requests -->
	<servlet>
		<servlet-name>appServlet</servlet-name>
		<servlet-class>org.springframework.web.servlet.DispatcherServlet</servlet-class>
		<init-param>
			<param-name>contextConfigLocation</param-name>
			<param-value>
				/WEB-INF/spring/appServlet/servlet-context.xml
			</param-value>
		</init-param>
		<load-on-startup>1</load-on-startup>
	</servlet>

	<servlet-mapping>
		<servlet-name>appServlet</servlet-name>
		<url-pattern>*.html</url-pattern>
	</servlet-mapping>

	<filter>
	<filter-name>encodingFilter</filter-name>
	<filter-class>org.springframework.web.filter.CharacterEncodingFilter</filter-class>
	<init-param>
	<param-name>encoding</param-name>
	<param-value>UTF-8</param-value>
	</init-param>
	</filter>

	<filter-mapping>
	<filter-name>encodingFilter</filter-name>
	<url-pattern>/*</url-pattern>
	</filter-mapping>

</web-app>
servlet-mapping에서 모든 요청은 .html로 받도록 했기 때문에 Controller도 수정이 필요하다.
<HomeController.java>
(RequestMapping 어노테이션으로 지정한 경로 뒤에 html을 추가)
vip.jsp, admin.jsp 에서는 사용자가 각각 vip, admin 페이지로 들어왔음을 명시만 했다.
package com.example.demo;

import org.springframework.stereotype.Controller;
import org.springframework.ui.Model;
import org.springframework.web.bind.annotation.RequestMapping;

/**
 * Handles requests for the application home page.
 */
@Controller
public class HomeController {

	@RequestMapping("/vip.html")
	public String vip(Model model) {
		return "vip";
	}

	@RequestMapping("/admin.html")
	public String admin(Model model) {
		return "admin";
	}
}
4. 실행
demo/vip.html 또는 demo/admin.html로 요청
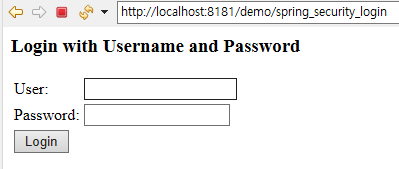
spring security에서 제공하는 로그인 페이지이다.
접근 권한을 인증 받아야 진행할 수 있게 필터가 정상적으로 적용된 것이며, security-context.xml에서 설정한 해당 name, password를 입력해야 통과된다.

로그인 성공(vip.jsp)

로그인 성공(admin.jsp)

로그인 실패

다음 포스팅에서는 spring security에서 제공하는 로그인 페이지가 아닌,
직접 만든 로그인 페이지를 적용해보는 시간을 가질 것이다.
[Spring] Spring Security(2) - 로그인 페이지 구현
Spring Security(1) 포스팅에서는 spring security에서 제공하는 로그인 페이지로 인증 절차를 거칠 수 있었다. kimcoder.tistory.com/244 [Spring] Spring Security(1) - 기본 사용법 만약 관리자 페이지처럼 특..
kimcoder.tistory.com
'Spring Series > Spring Framework' 카테고리의 다른 글
| [Spring] Mybatis (0) | 2021.01.26 |
|---|---|
| [Spring] Spring Security(2) - 로그인 페이지 구현 (0) | 2021.01.20 |
| [Spring] JDBC 트랜잭션 (0) | 2021.01.14 |
| [Spring] JdbcTemplate (0) | 2021.01.11 |
| [Spring] 게시판 설계 준비과정 (0) | 2021.01.07 |


댓글