Environment 객체를 쓰지 않고 .properties 파일들을 PropertyPlaceHolderConfigurer에 등록하여 간단하게 property 값들을 불러오는 방법을 알아볼 것이다.
이전 포스팅에서는 Environment 객체를 이용하여 .properties 파일들의 property 값들을 불러오는 방법을 소개 하였으며, 이전 포스팅에서 다뤘던 properties 파일들은 그대로 사용할 것이고, 소스코드는 이전 포스팅에서 다뤘던 소스코드와의 차이점을 중심으로 설명할 것이다.
[Spring] Bean의 생명주기 / properties 파일
1. Bean의 생명주기 bean의 생명 주기에서 특정 시기에 추가적인 동작을 시키고 싶다면 어떻게 하면 될까? 1) 인터페이스 방법 InitializingBean, DisposableBean 인터페이스를 상속해서 afterPropertiesSet(), de..
kimcoder.tistory.com
1. Xml 방식
<application.xml>
<?xml version="1.0" encoding="UTF-8"?>
<beans xmlns="http://www.springframework.org/schema/beans"
       xmlns:xsi="http://www.w3.org/2001/XMLSchema-instance"
       xmlns:p="http://www.springframework.org/schema/p"
       xmlns:context="http://www.springframework.org/schema/context"
       xsi:schemaLocation="
           http://www.springframework.org/schema/beans
           http://www.springframework.org/schema/beans/spring-beans-3.1.xsd
           http://www.springframework.org/schema/context
           http://www.springframework.org/schema/context/spring-context-3.1.xsd">

    <context:property-placeholder location="classpath:jooyeok.properties, classpath:lamb.properties"/>
    <bean id="infoConnection" class="com.example.demo.InfoConnection">
    	<property name="infoId_1">
    		<value>${infoId_1}</value>
    	</property>
    	<property name="infoPw_1">
    		<value>${infoPw_1}</value>
    	</property>
    	<property name="infoId_2">
    		<value>${infoId_2}</value>
    	</property>
    	<property name="infoPw_2">
    		<value>${infoPw_2}</value>
    	</property>
    </bean>

</beans>
- <context:property-placeholder> 전용 태그는 PropertyPlaceHolderConfigurer bean을 등록하는 역할을 하고, location 속성에 지정된 .properties 파일들은 PropertyPlaceHolderConfigurer에 등록된다. 이렇게 되면 .properties 파일의 속성들을 xml에서 치환(${})하여 쓸 수 있고, @Value라는 어노테이션을 이용하여 속성값들을 자바 코드에 불러올 수도 있게 된다.
※ PropertyPlaceHolderConfigurer는 bean의 메타정보 자체를 조작하는 bean 팩토리 후처리기다.
<InfoConnection.java>
- Environment 객체를 제거했다.
package com.example.demo;

import org.springframework.beans.factory.DisposableBean;
import org.springframework.beans.factory.InitializingBean;

public class InfoConnection implements InitializingBean, DisposableBean {
	private String infoId_1;
	private String infoPw_1;
	private String infoId_2;
	private String infoPw_2;

	//setter, getter 생략

	@Override
	public void afterPropertiesSet() throws Exception {
		System.out.println("afterPropertiesSet()");
	}

	@Override
	public void destroy() throws Exception {
		System.out.println("destroy()");
	}
}
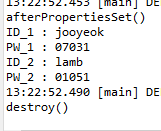
실행 결과
package com.example.demo;

import org.springframework.boot.autoconfigure.SpringBootApplication;
import org.springframework.context.support.AbstractApplicationContext;
import org.springframework.context.support.GenericXmlApplicationContext;


@SpringBootApplication
public class DemoApplication {

	public static void main(String[] args) {

		String configLocation = "classpath:application.xml";
		AbstractApplicationContext ctx = new GenericXmlApplicationContext(configLocation);

		InfoConnection infoConnection = ctx.getBean("infoConnection",InfoConnection.class);
		System.out.println("ID_1 : "+infoConnection.getInfoId_1());
		System.out.println("PW_1 : "+infoConnection.getInfoPw_1());
		System.out.println("ID_2 : "+infoConnection.getInfoId_2());
		System.out.println("PW_2 : "+infoConnection.getInfoPw_2());

		ctx.close();
	}
}
2. Java 코드 방식
<ApplicationConfig.java>
package com.example.demo;

import org.springframework.beans.factory.annotation.Value;
import org.springframework.context.annotation.Bean;
import org.springframework.context.annotation.Configuration;
import org.springframework.context.support.PropertySourcesPlaceholderConfigurer;
import org.springframework.core.io.ClassPathResource;
import org.springframework.core.io.Resource;

@Configuration
public class ApplicationConfig {
	@Value("${infoId_1}")
	private String infoId_1;
	@Value("${infoPw_1}")
	private String infoPw_1;
	@Value("${infoId_2}")
	private String infoId_2;
	@Value("${infoPw_2}")
	private String infoPw_2;

	@Bean
	public static PropertySourcesPlaceholderConfigurer Properties() {
		PropertySourcesPlaceholderConfigurer configurer = new PropertySourcesPlaceholderConfigurer();
		Resource[] properties = new Resource[2];
		properties[0] = new ClassPathResource("jooyeok.properties");
		properties[1] = new ClassPathResource("lamb.properties");
		configurer.setLocations(properties);
		return configurer;
	}

	@Bean
	public InfoConnection infoConfig() {
		InfoConnection infoConnection = new InfoConnection();
		infoConnection.setInfoId_1(infoId_1);
		infoConnection.setInfoId_2(infoId_2);
		infoConnection.setInfoPw_1(infoPw_1);
		infoConnection.setInfoPw_2(infoPw_2);
		return infoConnection;
	}
}
- 스프링 설정용 클래스 파일이다.
- 각 필드 위에 @Value 어노테이션을 붙이면, PropertyPlaceHolderConfigurer에 등록된 .properties 파일들을 참조하여 이름에 맞는 속성값을 받게 된다.
- Properties() 메소드에서는 .properties 파일들을 PropertyPlaceHolderConfigurer에 직접 등록해준다.
※ static 메소드이므로 이 클래스가 생성되기 전에 호출되어 미리 properties 파일들을 받아 놓는 것이다.
※ xml에 <context:property-placeholder> 네임 스페이스 태그를 이용하여 .properties 파일들을 지정해뒀다면 이 메소드는 필요하지 않다.
※ 다음과 같이 @PropertySource 어노테이션을 이용하여 프로퍼티 파일들을 PropertyPlaceHolderConfigurer에 등록시키는 방법으로 대신할 수도 있다.
@Configuration
@PropertySource(value={"jooyeok.properties", "lamb.properties"})
public class ApplicationConfig {
    ...
}
- infoConfig() 메소드에서는 @Value 어노테이션으로 가져온 속성값들을 InfoConnection 객체에 넣어서 반환한다.
실행 결과
- 스프링 설정용 JAVA 클래스를 사용할 것이기 때문에 AnnotationConfigApplicationContext 클래스를 이용한다.
package com.example.demo;

import org.springframework.boot.autoconfigure.SpringBootApplication;
import org.springframework.context.annotation.AnnotationConfigApplicationContext;

@SpringBootApplication
public class DemoApplication {

	public static void main(String[] args) {

		AnnotationConfigApplicationContext ctx = new AnnotationConfigApplicationContext(ApplicationConfig.class);

		InfoConnection infoConnection = ctx.getBean("infoConfig",InfoConnection.class);
		System.out.println("ID_1 : "+infoConnection.getInfoId_1());
		System.out.println("PW_1 : "+infoConnection.getInfoPw_1());
		System.out.println("ID_2 : "+infoConnection.getInfoId_2());
		System.out.println("PW_2 : "+infoConnection.getInfoPw_2());

		ctx.close();
	}
}
'Spring Series > Spring Framework' 카테고리의 다른 글
| STS에 Spring Legacy Project가 없을 경우?? (5) | 2020.12.30 |
|---|---|
| [Spring] profile 속성 / AOP(1) - xml 이용 (0) | 2020.12.28 |
| [Spring] Bean의 생명주기 / properties 파일 (0) | 2020.12.22 |
| [Spring] IOC 컨테이너 설정(3) - xml, @(Annotation) 혼용 (0) | 2020.12.22 |
| [Spring] IOC 컨테이너 설정(2) - @(Annotation) (0) | 2020.12.21 |


댓글